Wednesday, March 14, 2012

Makeup Organization

As part of my current goal to finish my spring cleaning challenge the first thing I decided to tackle was my unruly makeup bin/bags. The really have gotten to a point where I am scared to dig through them anymore. And because of the unorganized mess I tend to just wear what is on the top and move on making my rather large collection of eye shadow options obsolete.

What you need:
  1. Big Picture Frame (got mine from the Goodwill Store for $6)
  2. Cute fabric (got a half yard so to have extra for my scrap quilt too $3)
  3. Piece of Sheet Metal. Lowe's carries this in the hardware department. I got a piece that was about $10 that was the right size on direction but not the other and used metal snips to cut it to size.
  4. Magnets (these are located in the craft section of Walmart for about $5)
  5. Hot Glue Gun (Glue Sticks!! Lots!!)

So the first step is to go through and throw out all of the stuff that is completely outdated or never ever going to be something you used. It is probably time to let go of the crazy colors of makeup you bought for Halloween 4 years ago say "oh I will use this again" and never have too.

Once you sift through it all and now no what is actually your current makeup collection the next step is to pick a large frame and some cute fabric to go with it.


Next hot glue the fabric to the sheet metal. Try to make sure you keep the fabric design straight if it is some that is symmetrical and will look odd at an unintentional angle..


You will what to make sure that there is not a lot of slack in the material too. If it has to much space it will effect the ability for the magnets to hold your makeup.


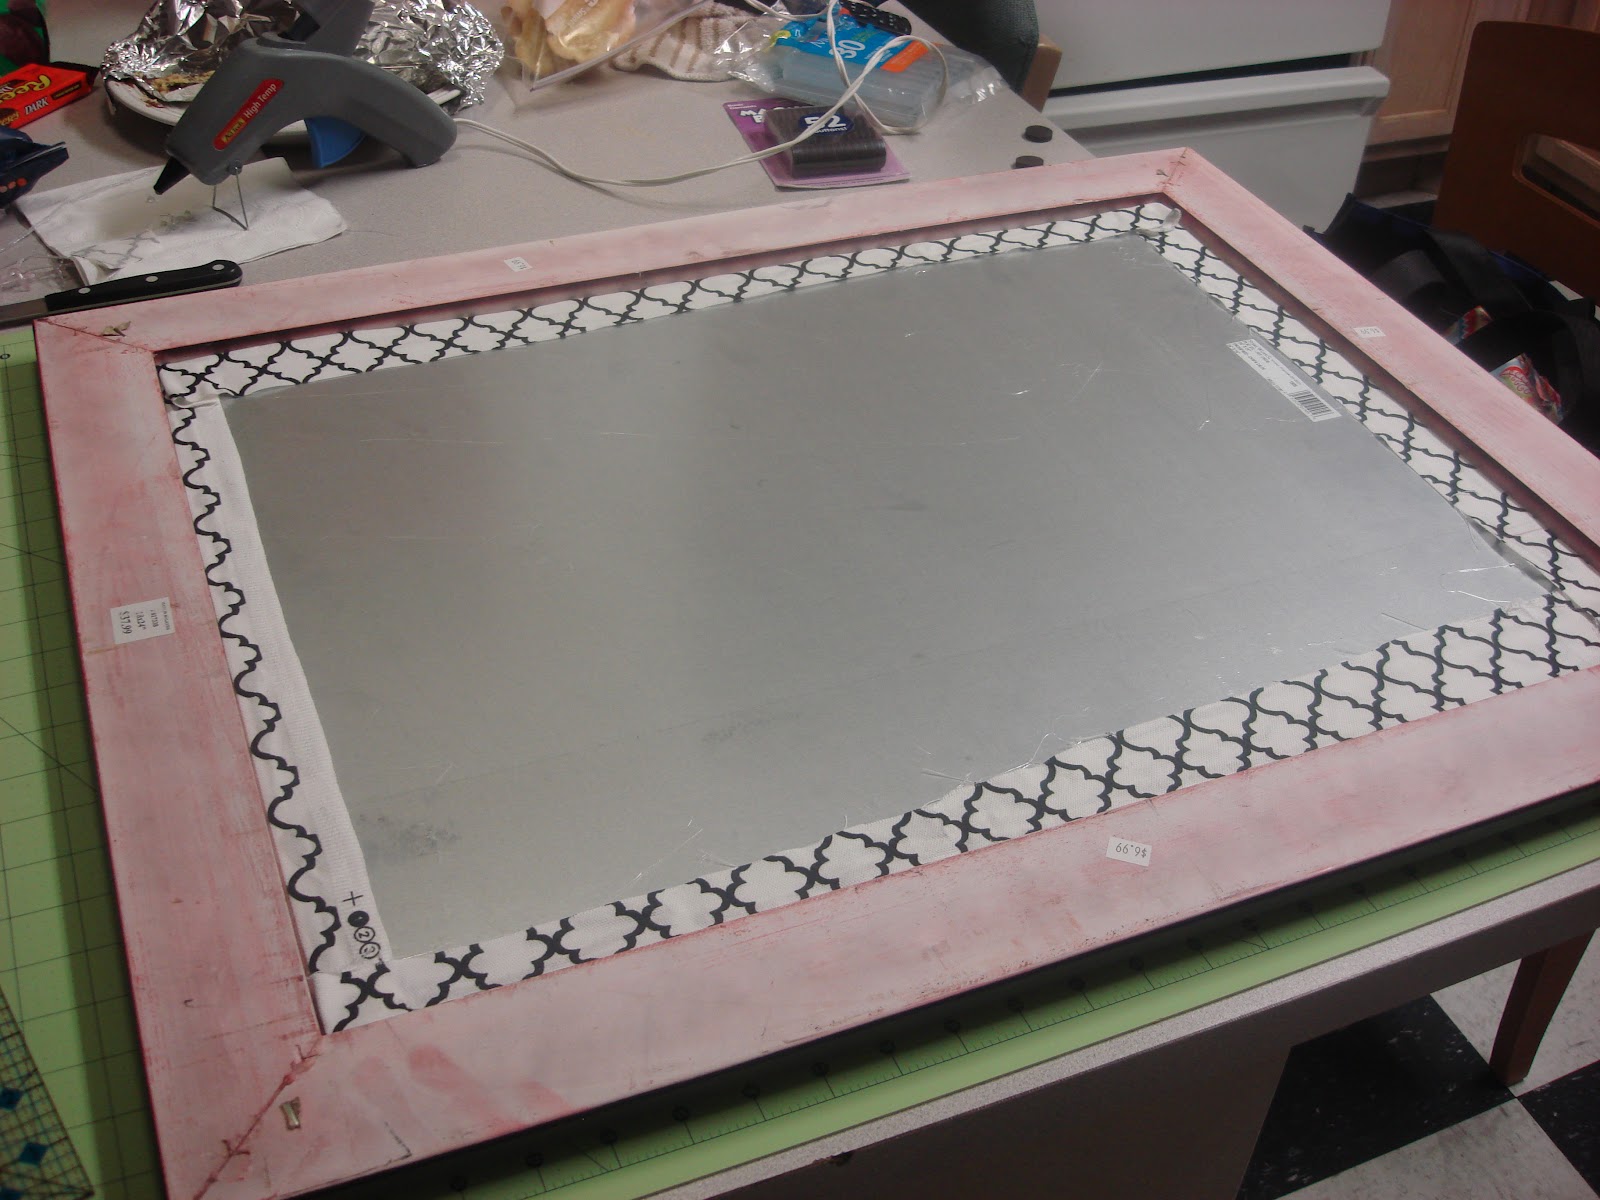
Next hot glue the covered fabric in to the frame. Take a minute after the glue has had a chance to cool to softly push around the edges and add glue where it is needed.


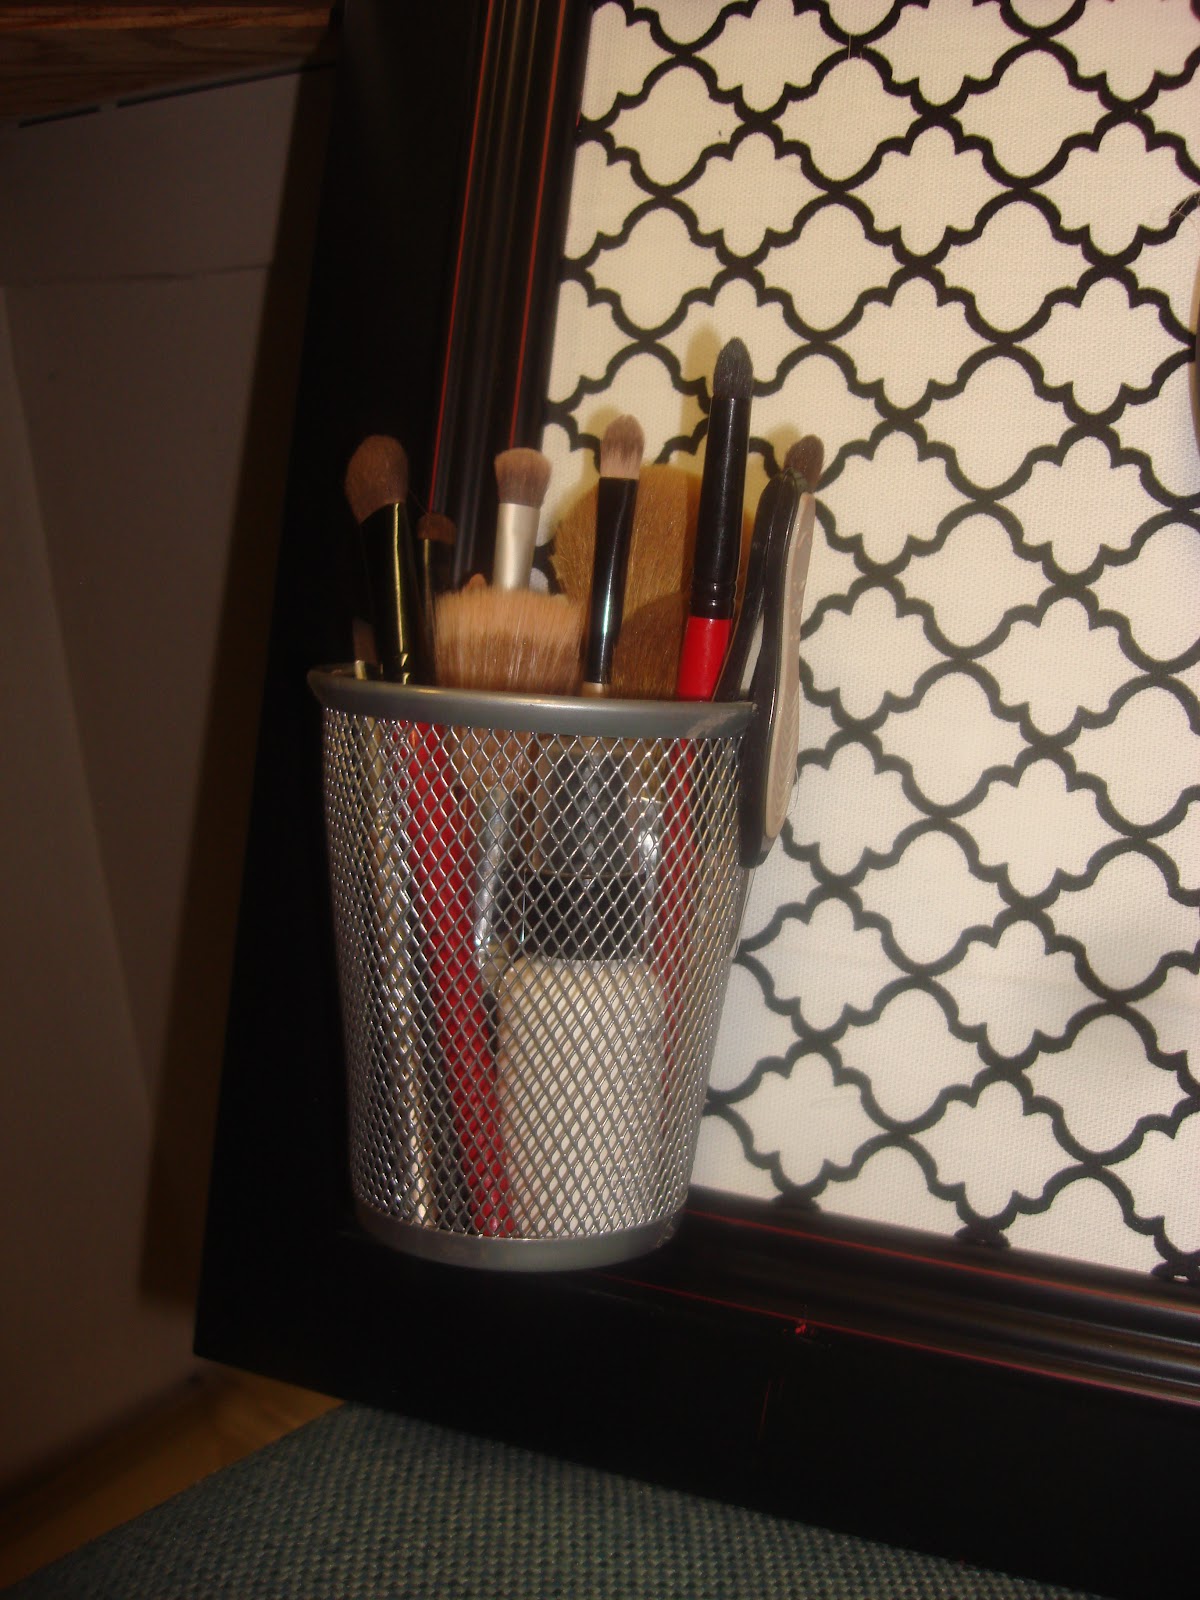
The final step is to attach magnets to the back of your containers and stick to your board. I used a pencil cup to make the brush holder and three magnets to hold it to the board.


Happy Crafting 
Katie <3

Tuesday, March 13, 2012

The Spring Cleaning Challenge.


With such a beautiful day of 80 degree weather, birds singing, flowers blooming, and lots and lots of sunshine has me deep in the spring mood. Spring always puts people in a great mood just the general mood of students around me today is just so much nicer. Not that I can blame them for being done lately with the 5 straight days of rain here. But that great mood that spring brings is definitely not happening so much in my apartment. Problem? I think so!

Answer? Spring cleaning! Of course! So once this epiphany was reached the next plan was "now what?". I decided it was time to give myself a challenge to make my apartment/world feel fresh inviting and creative.

 So here is the challenge:

Challenge yourself to create, clean, organize, or remodel some aspect of your life/world around you everyday for 2 weeks. Seems simple enough. Right? You can do something as finish a project that has been just been hanging around for awhile waiting for you to complete it or reorganize a specific thing in your space.

My first challenge for myself is to tackle my not so organized makeup collection.

Here is a website with some really good ideas that real people have used to organize their makeup collection.
Here  is a very adorable vanity DIY that is pretty inexpensive and easy to make.

Always a good source of organization and definitely in love with this counter-top brush holder.


Happy Crafting
Katie <3

Friday, March 9, 2012

Pillowcase Dress

*****Update*****
Here is a more resent use of this project. She got a new Mardi Gras Dress for the Parade that she was in this year. Rather than being in one piece it did it in two sections. To finish it I embrodered the front. She was the cutest little kid there.


Today's spot of creativity turned out to be a flower dress for the mini-me. I bought a yard of this white and pink embroidered material that was on sale awhile back and decided today was the day to do something with it. So here is the how to details.

I started with two 20 by 22 inch pieces cut from the fabric. (I cut it to 20 inches and then cut done the fold already in the fabric from the store.) My niece has a measurement of about 21 inches around her stomach and she wears a 2T so you will need to adjust the size for your little one.

I just put the right sides of the fabric together and did the side seams stopping the seam about 7-8 inches from the top to make the arm holes with later.


Thought I would sneak in my little helper for the day. You can imagine how much help a 21 month old is.


To do the arm hole you need to fold them over twice at an angle.mine after the second fold are about the width of my finger.


You need to sew from the top of the fold (the widest part) to the bottom edge.

At this point you have the bottom hem left and the the top pocket for the ribbon to tie the dress. I put a 3/4 inch hem in the dress but that is always adjustable to fit the height of your little crazy.

To do the top pocket for the ribbon I folded the edge down slightly and then folded it down to fit over my ribbon. (Make sure to un-tread your ribbon before you sew it so you don't get the ribbon in the seam.

Well at this point you have a completed dress. I recommend you to a small stitch on the inside of the top pocket the holds the ribbon in the middle to make the ribbon stay in place instead of having to retread in all the time.


Well I hope this was help full. Sorry the picture of my little model isn't great it was far past nap time for this little one when I finished. If it wasn't clear send me a comment and I will try to clear up the questions.

Katie <3

Monday, March 5, 2012

The hunt for the perfect makeup...

***Update***
Thought I would show everyone what the finished makeup kit ended up looking like. She ended up with her own little hand sewn bag. I also added a plastic nail polish and a plastic lipstick that her grandma found a the dollar store.


So I have been looking in stores and online for weeks at little girl play make-up kits. It has become apparently obvious that they no longer make the kits like I had as a child. The ones that were entirely plastic in no form truly make-up and almost completely toddler proof. Some thing like the lip stick in this set:


But anyway I can't find anything like this. This new generation of little girls seem to be more trust worthy with "play" make-up that is STILL make-up!!! Just a far more discussing version of it...

As a solution to this I have had a light bulb moment! In case your not sure what that is I will let one of Mini-me's favorite movies explain. I decided that of course the answer was to make it!! Well with the semester starting and it being senior year I thought let me give it one more shot and see if I can buy someone else has crafted for toddlers. Well that plan quickly fell through when I discovered that they are far to expense for a college student no matter how CUTE they are!! I attached one of the favorites I found.

Of course the next plan of action is to decide how to make them myself. Well I have a make-up kit that could put some professionals to shame. So the plan then became to dig through my current make-up mess and the dollar tree and find cute containers that could now become Mini's.


So the first step was to go pick up this loot from the dollar store. The plan is to empty this eye shadow case, get a powder compact from the roommate and a few other things and make an awesome kit!!


*****UPDATE******

 They will need to sit for a few days to dry out.


Once dry grab a cute little bag to store and give it to the little princess to enjoy!!

Happy Crafting
<3 Katie

Thursday, March 1, 2012

Extra Closet Space

****UPDATE*****
Once again please ignore my messy room! But look how cute the rack turned out!!!


This weekend I had Daddy help me with a project to work on making some more useable space in my closet. The answer was an extra hanging bar and a set of plastic drawers I can hide in the closet floor.

What you need:
  • Small piece of plywood
  • (4) wheels ( I used round ones that allow the rack to roll in all directions)
  • (2) long pipes for the sides (5' long, 1/2" diameter is what I used)
  • (1) short pipe for the top (2' long, 1/2" diameter is what I used)
  • (2) 1/2" 90 degree elbows
  • (2) 1/2" floor flanges
  • Screws
  • Screwdriver
  • Paint

Here is a picture of the finished product before paint. Please ignore the messy room.. I think it is going to work great!!

Happy Crafty
<3 Katie

Tuesday, February 28, 2012

Handmade Bangles


My aunt was having trouble finding bangles she liked so we decided that making them would be a good plan.We picked up some baking clay from Hobby Lobby while they were on sale 40% off (they are normally $1.99).


The four packs here can make about 16 bracelets depending on how many colors you put in each bracelet and how thick you make the bracelets.

Step One:
Break off a peice of clay and roll it out with your hand to make a long rope of clay.


Step Two:
Once you have the number of colors you want in the bracelet. Stack them together and roll them again to make them smooth.


Step Three:
Use a ring that is the proper size for you to get it over your hand and measure out your bracelet. Removing the excess clay from the ends.


Step Four:
Bake the bracelets for 20 minutes at 275 in your oven.


Happy Crafting
<3 Katie

Saturday, February 25, 2012

Irish Car Bomb Cupcakes


For the Chocolate Stout Cupcake:
Ingredients
1 (12-ounce) bottle Guinness Stout
1/2 cup milk
1/2 cup vegetable oil
1 tablespoon pure vanilla extract
3 large eggs
3/4 cup sour cream
3/4 cup unsweetened cocoa
2 cups sugar
2 1/2 cups all-purpose flour
1 1/2 teaspoons baking soda

Instructions
1. Preheat the oven to 350°F.
2. In a large mixing bowl, combine the Guinness, milk, vegetable oil, and vanilla. Beat in the eggs, one at a time. Mix in the sour cream.
3. In a large mixing bowl, whisk together the cocoa, sugar, flour, and baking soda. Gradually mix the dry ingredients into the wet Guinness mixture.
4. Butter 24 muffin tins and divide the batter among the muffin tins.
5. Bake 25 minutes, until risen and set in the middle but still soft and tender. Cool before turning out of the tins.


For the Gnache:
3 1/2 oz bittersweet chocolate
1/3 cup heavy cream
1 tablespoon butter
1 teaspoon Jameson whiskey (or other whiskey)
1/2 teaspoon vanilla extract

Instructions
Gently heat cream on the stovetop or in the microwave
Add chocolate and let sit for a few moments
Stir gently until chocolate is melted and combined with the cream
Mix in butter, vanilla, and Jameson
Allow to cool until thick
Spoon into a pastry bag or plastic bag

For the Frosting:
Ingredients
1 1/2 cup powdered sugar
1/2 cup butter (room temperature)
2 tablespoons Baileys (or other Irish cream liquor)

Instructions
Pour all ingredients into a bowl
Using a spatula (or electric mixer, if you're into that kind of thing) mix until very well combined
Spoon into a pastry bag or plastic bag and chill until ready to use


To put the cupcakes together you will need to first using a spoon take the center out of the cupcake. Next, fill wih the ganache but try to make she it is not over flowing. It will make your icing run off it is. Last just add icing on top.

The recipe for the batter does make 24 cupcakes the wrappers need to be pretty full because the batter doesnt do a lot of raising. I made 2 batches of ganache and icing to have enough for 24 cupcakes.

Happy Crafting
<3 Katie

Ingredients

Wednesday, February 22, 2012

Keep your carpet from moving.

 The carpet in my bedroom has this annoying habit of "walking" across my room. So this week to help with this problem I have a easy tip!


Use some all purpose caulk and draw lines on the bottom of the carpet. And allow it to dry. (My helper got bored and started playing tic tac toe.)


Once it is dry IT'S DONE! Just turn it back over and put it where it goes!

Happy Crafting
<3 Katie